
By Mace R. Abrams
Editors Note: I first saw Mace’s work through photographs but quickly realized that I seen it before – in big screen movies. Mace is a professional model builder/supervisor/rigger at Stageco and has honed his techniques in the high pressure field of motion picture development. His technique for cleaning up clear injection molded parts work great, and he was kind enough to write and article and take sample pictures. I have found it very useful and I hope that you do too – Alan Bussie
As your skill in model building grows, you begin to choose more advanced model kits. In these advanced subjects you will frequently encounter additional clear plastic pieces such as fuselage, cowls and walls or hulls. For example, there are several kits of military submarines that have clear sections of hull so you can see the interior compartments and deck levels. There is also the famous Monogram Visible B-17 and the LS Ki-109 with all clear fuselage and cowls.
No matter how careful you are in your construction, accidents do happen. Suddenly the transparent hull pieces or windows get clouded or scared from glue on your fingers or by a masked area lifting up while airbrushing. In fact, I made the “boo-boo of all time” by thinking that I could clear a transparent hull section as I clear coated the entire model. Now what do I do? The entire submarine interior that I worked so carefully to detail was now obscured by a fogged opaque hull half!
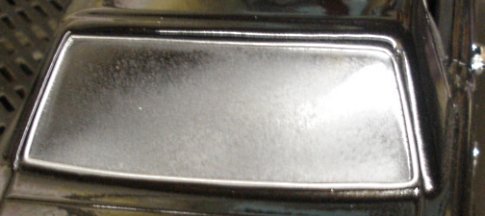
Sample Damaged Clear Part
After thinking about the problem, I realized that when my windshield on my motorcycle is marred, I just carefully polish the windshield out. Also remember that even clear plastic surfaces are finished using extremely fine sanding and polishing techniques. So what is so different about the clear plastic in a model kit? The answer is – nothing – at least not when it comes to removing scratches, haze and unwanted material.
Let’s start with the materials. You will need 400 and 1000 grit ‘wet-n-dry’ sandpaper and Novus 2 plastic polish.
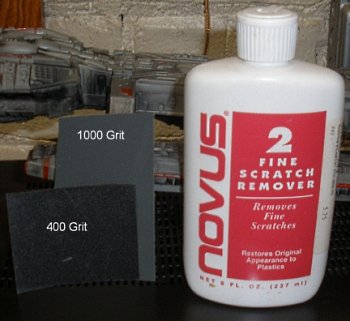
Required Material
I start carefully wet sanding the surfaces with 400 grit ‘wet-n-dry’ sandpaper until the majority of the material coating or the flaws in the clear plastic are removed. You can wet sand with water, but I like to add a few drops of dishwashing liquid to the water. This will keep the sandpaper from gumming up and will also make it last longer. Always remember to use a circular pattern when sanding.
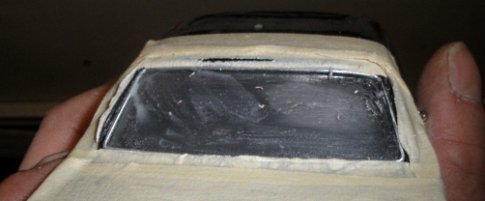
After 400 grit sanding
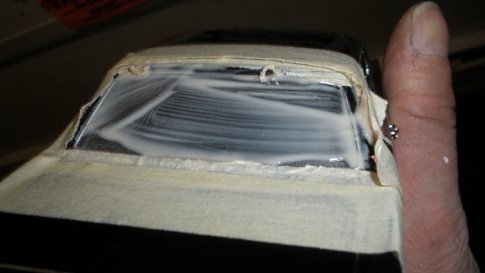
Once I am satisfied the majority flaws are removed, I switch to a 1000 ‘wet-n-dry’ grit sandpaper and wet sand to remove all flaws 400 grit scratches. The clear plastic should now look uniformly scuffed but don’t worry. It is suppose to look like that while at this stage.

After 1000 grit sanding
Now the magic of restoring the surface back to a gleaming, clear transparency! At Harley-Davidson I buy a liquid for removing fine scratches in my bike’s windshield called Novus 2 Fine Scratch Remover. With a soft cloth and applying a slight bit of pressure, I apply the liquid in a circular motion and let it dry. Drying only takes a couple of minutes. With a soft cloth, buff off the scratch remover. You may have to do this a few times to fully restore the surface back to a crystal-clear piece of plastic.
Applying Novus and Polishing

After hand-buffing
Here is a suggestion for the Advanced User Only – Rather then using a cloth to apply the scratch remover and remove the dried liquid, I choose to use a Dewalt 18v drill with a very fine buffing pad. Keeping a constant speed (3/4 of full speed), I move the buffing pad smoothly over the area that the scratch remover has been applied to. You would absolutely be amazed how the clearness of the part is fully restored. A word of caution: Be very careful how fast you let the buffing wheel go and keep it wet with the polish. Never let a spinning buffing wheel remain in one spot. This can build up enough friction heat to create melted or burnt spots in the plastic. For small areas you can use a polishing pad on a Dremel.

Power Drill with Buffing Pad
This method really does work magic. You can remove paint, CA fog, fingerprints and other gluing mistakes. In addition, you can create clear parts that are far superior to stock ones. Just carefully sand undamaged injection molded clear parts with 1000 grit sandpaper and polishing them as above. You will be amazed how much better they are than ‘out-of-the-box’ parts!