by Eric Freese.
There are plenty of WW I planes in my collection and plenty more to add as well. I’ve always been amazed at the guts it took to get in a fabric and cloth covered kite and hit the throttle. But to go into aerial COMBAT? The flight environment was brutal enough! Some planes were pushing miles high and hypoxia always a threat. Temperatures were brutally cold at minus 20 or 30 degrees. Observers sat or stood at a gunners platform in the onslaught of frigid air and faced oncoming fighters from behind a single defensive gun.
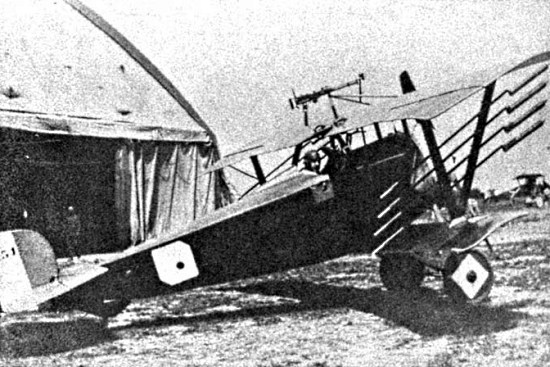
WW1 Nieuport 16 fighter with air to air rockets for attack on balloons. The pilot is Charles Chouteau Johnson (photo courtesy of Wikipedia)
Years ago I had the rare opportunity to actually see WW I fighters “dogfighting” in the air. Northern Virginia was, and still is, home to the Bealeton Flying Circus. It is the last continually running, barnstorming, grass field, flying circus… apart from Cole Palen’s Old Rhinebeck in N.Y.. Among the beautiful restorations and exact replicas was a Nieuport 17. I was in love with the beauty of this bird! Alas, the WW I aircraft went away, replaced with Stearmans, Fleets, Wacos, Ryans and J-3 Cubs. Years later little did I know that I would be getting my flight training in a 1929 Fleet model 9 from this same field. I even wound working with the Flying Circus for a few years!
Just for grins, the little Aurora Nieuport 11 leapt out at me one day, with all 8 red rockets hanging from the wing struts. I did some on-line research and was amazed at the LePrieur balloon busting
rockets, the first use of rockets with aircraft. The chivalry of the day forbade pilots from firing them at anything other than balloons. The tactics used were dangerous as well: a steep dive had to be used, then at the correct moment electrically fired LePrieur rockets attached to bamboo poles would launch from steel tubes. These over-grown bottle rockets would hopefully explode at, or in, the balloon envelope. The pilot had mere seconds to close in to near point-blank range, fire, and bank away…before the ball of fire consumed the not only the enemy but his plane as well.
(click any photo to enlarge)
In high speed descents Nieuports were prone to flutter and shed the slender lower wing. Did I mention they were to attack in a dive? Along with the point-blank tactics, there was the issue of intense ground always present around the balloon. No doubt, this took guts. A docent at the Udvar Hazey air museum at Dulles, Va. once informed me of a direct conversations he had with a WW I pilot. The veteran informed him that many men were killed just starting up their planes. The oil soaked fabric and wood aircraft were tinderboxes. A simple backfire or over-primed engine meant disaster.
(click any photo to enlarge)
I had to build this little Aurora model. I decided to keep it in the tradition of the Classic Build approach- “Strait From The Box.” The first thing was research. She was simply a delight to read up on and I studied endless photos of this bird from a great many books. For smaller accessories, I took notes on the best way to tackle this little bird. First off, I laid out all parts and studied them carefully. The kit is molded in silver and black with modest bits of flash- no surprise! The assembly sequence basically requires prepainting virtually all components before assembly. That includes the fuselage, wings and struts. All “fabric” areas (wings, fuselage, etc.) were sprayed Testors silver.
(click photos to enlarge)
Detailing the engine, pilot, struts and rockets was easy enough. Research for the pilot’s color scheme was a moot point. Dashing RFC and other uniforms were always layered over with leather, fur and cloth flying suits…basically various browns on brown…yawn. It seems that the cockpit area was composed of plywood skirting on the sides then fabric. Seats were curved perforated plywood or wicker. Usually a plane sported 3 or 4 gauges, at most. I would later discover the instrument panel refused to allow the pilot to fit! I wound up tossing the panel, as the pilot consumed the entire tiny cockpit opening. Besides, there was no room to see inside anyway!
(click any photo to enlarge)
The cockpit area was painted up and pilot and seat added. I basically followed the Aurora instructions. The cowling was one weak spot that beckoned me to tweak it just a little. The lower area was left open, as such, and it had a very wide area of plastic exposed where there should only be a thin metal cowl. In scale this was equal to a 6 inch thick cowling- No way! So I simply cut away at a 45 degree angle and dressed the edges. Please see the photo showing before and after.
(click any photo to enlarge)
The inside line at the aileron to wing was gently cut open with an X-Acto saw- an easy, realistic improvement to these types of kits. The sinkholes are here and there, so I just sanded them a bit to soften the hard edge. No putty, this is classic build! The flat silver of the Testors paint did much to hide the rest. Some parts could be assembled face down, thus preserving the flawless finish right side up.
The crisp black edges along the wings and fuselage were made by using a standard Permanent marking pen with the standard fat 1/4 inch nib. Use a crisp new pen! Always use a spare part or test model as a “warm-up.” The ink will be dark and rich, with only one pass needed and no “fuzz” to destroy the clean lines. I held the pen at a 45 degree angle to the edge of the wing and gently pressed the wing edge into the nib. Just slide it along, and bam…it’s done! The black piping was done in 10 minutes.
(click any photo to enlarge)
I trimmed the various struts, carefully laid them out on paper and labeled each part. Once the fuselage was done and engine and cowl applied, it was time for wings and things! I always love the part in assembly when the wings go on…”It’s ALIVE!!!” Again, it is important to pre-paint the parts along the way. Photos revealed the cowling was grungy, not shiny and polished, so I brushed the paint on it instead of spraying or polishing.
The V-struts were applied with an X-Acto adjustable clamp tool, to fine-tune the precise angles both from the front AND from the side for proper alignment. I use Crazy Glue…so it has to be right on the first pass. Once the upper wing and tail were installed, I was getting the grins. Wow! The landing gear was next. It was a bear to keep all three components aligned at the proper angle…but I finally got it right, and heaved a sigh of relief! Crazy Glue GEL gave me the time I needed.
(click any photo to enlarge)
I held off on the Lewis gun above the top wing because it was too easy to snap off during handling. Then came the rigging. Various research and pictures showed the proper alignment and placing. My technique is straightforward- I drilled a few small pin holes in the fuselage early on (as needed). When it came to the struts, I don’t usually drill into the smaller size struts as the hole will remove nearly half of the surface area! I simply wrap the monofilament line around, use a dental pick to hold it in place, drop a bit of Crazy Glue to tack it down, then spider web my way along to the next, next, and next. I used a pair of gripper tweezers to keep the tension while the glue set. Please see the photos.
Into the final stretch! Time to add the decals and Lewis gun. I always give older decals a clearcoat, just as insurance that they won’t disintegrate. Finally came the rockets. I found that the steel launch tubes were painted a dark or black finish. The red tips are pure (Aurora) conjecture. It took a little effort to get them all perfectly aligned. The steep mounting angle along the struts is correct with the molded-in small alignment slots along the outside of the struts. Reference photos of these amazing rockets verified the unusual angle.
(click photos to enlarge)
When I sit back and look at this little silver bird… I’m amazed at just how much attitude it has. It would make an interesting side-by-side comparison to a P-47 or Hawker Typhoon of WW II fame. I wonder if they ever considered taking out tanks (with Nieuports) in WW I? But that wouldn’t be chivalrous!
(click photos to enlarge)
Kit Specs
Aurora Nieuport 11 Bebe Kit # 754. 1/48th scale. With balloon-busting LePrieur rockets mounted on V-struts. “Working” rotary engine, with Lewis gun and pilot figure and modest cockpit. Good decals, fair instructions and rigging diagram.
Reference Sources
Various on-line articles, museum photos, and Wikipedia sources. LePrieur rocket photos from: thevintageaviator.com (Nieuport 11 close-up)
Books
Time Life: Knights of the Air
Classic WW I Aircraft, Melvin Hiscock
(Smithsonian) Book of Flight, Water J. Boyne


