Background
There have been several really good modeling articles written about using aluminum foil and hobby foil to generate the natural metal finish (NMF) of unpainted aircraft. The photographs of the finished product(s) show exquisite detail and realism that can’t be matched by any other method. While these articles focus on the technique of applying foil, there are some details I think could be added to create even more realism. This article will focus on “paneling” and effects that can be used prior to applying foil to a model. Most of the topics presented are the result of much trial and error and are conveyed to simply add to the information that others have already provided.
I’ve had many jobs over the years that required working with aluminum castings and aluminum sheet. One of those jobs was as an Aviation Metalsmith in an A-4 squadron in the late ‘60’s and early ‘70’s. As an avid, casual modeler, I have always wanted to recreate some of the unpainted planes of the same era. Until about five years ago I used buffing and non-buffing metalizers with varying degrees of success and satisfaction. One day I opened a Nestlé’s Crunch bar and suddenly realized that I had a better solution right there in my hands. I found some foil glue at Wal-Mart, an Italeri F-104, and some available time. I was very pleased with the outcome and hopelessly hooked….

I was curious about what other modelers had done with foiling projects. I found several articles that showed me where I had gone wrong and where my approach had differed. I decided to try the new things I had learned on other model aircraft and some automotive projects as well. My love affair with bare-naked airplanes and natural metal finishes has resulted in the completion of several models where I utilized my “tin-bending” experience and added realism I had yet to achieve with paint systems.
Alan Bussie has asked if I would share some of what I have learned with other modelers who might want to try similar projects. First-time “foilers” might be able to avoid some of the pitfalls I encountered. Experienced foilers will probably recognize most of what is here, and will hopefully sympathize with the anguish I encountered while trying to recreate the NMF realism. I need to start at the very beginning to establish a little understanding of my approach. First of all, we need to look at some of the properties of aluminum.
Aluminum 101
Aluminum sheet can have many colors and reflective properties determined by the amount and type of working the panel has encountered during the fabrication process. Newly formed pieces can be very shiny and/or appear to have a light “grain”. Stressed and non-stressed skin can have colors that range from silver-gray to dull gold, all determined by the alloy, heat treat or anodizing, and the manufacturing process. The color and reflectivity of aircraft aluminum will also change over time with exposure to the elements. For example, this picture shows an aluminum repair and riveting practice piece I did in Navy “A” school. Notice that the sheen is all but gone and the color has turned to a dull grey. The varying colors and reflectivity of aluminum present a myriad of modeling opportunities.
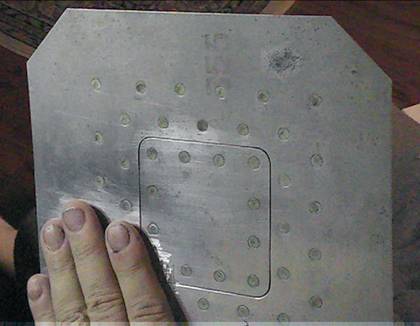
I enjoy building models that simulate a plane that has just rolled off the assembly line. It is easy to miss some of the detail this type of model should have and/or should not have. For example, panel line color. I really admire those who take the painstaking time to ink panel lines. However, the edges of unpainted aluminum aircraft panels are burnished to a highly reflective finish (see the square patch in the picture). Burnishing is done with a very hard round tool, such as a drill bit shank. Burnishing is not done for appearance; it is used to eliminate tool marks and to minimize any tendency to crack. The seams age to a weathered, less reflective finish as the plane sees service, but never turn black naturally. (Buffed aircraft may have some buffing residue left in the seams that will appear darker in color.)
The “grain” of some panels can be viewed by turning a panel in different directions in bright light. In some hardened alloys, this grain is similar to wood grain. Bending and forming with the grain of hard aluminum must be done with caution. Bending and forming across the grain can actually tear or break the material. Using steel wool to buff a foiled model can generate similar interesting and realistic effects. However, grain lines are straight and parallel. Bidirectional buffing generates unrealistic elliptical swirls. Also, if the entire model is brushed with steel wool, the panels will all look the same and the model will look more like a die cast replica. Not all panels show grain, but panels that do should be “grained” before they are applied to maintain the best realism (more on this a little later).
Both sides of foil can, and should be, used when paneling a model. At first some panels might not have the desired “scale” reflective properties. However, aluminum foils “weather” just like aluminum sheet. Foil applied to a model will lose it’s “out of scale” high gloss and will dull enough to look very realistic. This will not happen if the model is clear-coated after foiling. This F-86 is about four years old. When first built the leading and trailing edges of the wing were quite reflective. Without clear-coating the sheen softened in a normal room environment.
“A Flawless Application of Foil to a Model is not Necessary”
Before I lose all credibility, take a look at this real F-100. The pictures show just how rippled most aircraft skin really is on the planes of the 50’s and 60’s. Russian aircraft are worse yet! However, the ripples you get when applying foil usually occur as a result of surface blemishes, dirt particles, cat hair, or other foreign objects. Scale skin ripples are just one more oddity to think about.
Materials
Foiling materials can be found everywhere. I have sheets of all the Bare Metal Foil products and a stash of Nestlés Crunch bar foil. (Nestlés lost a customer when they changed their wrapping technique.) I also go to the local “Dollar” stores and pick up every brand of aluminum foil I can find, including the various thicknesses of Reynolds wrap. Why? Airplanes are built from a variety of metal panels and sheets that come from many vendors. Therefore, the panels will vary in color, sheen, and grain simply because they come from different aluminum mills and different rolls of raw materials. The careful distribution of the various foils on a model adds to the realism. I use the thin (cheap) foils to cover compound curves, the “better” quality foils for the airframe, and Bare Metal foil for canopies and minute detail.

The Projects
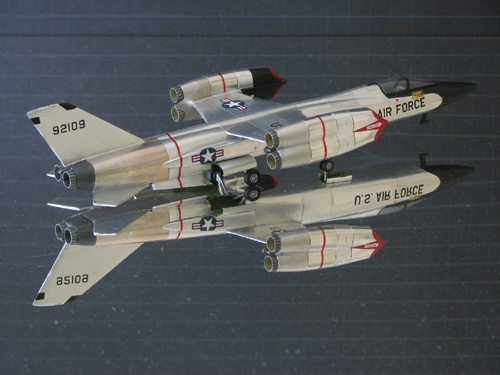
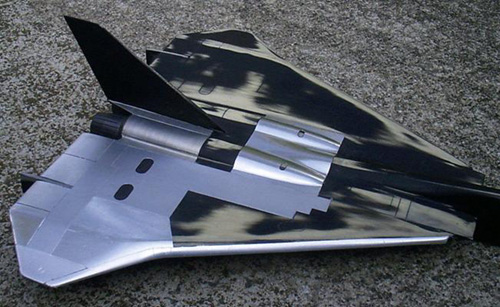
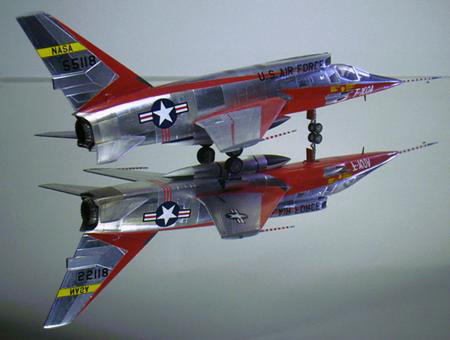
I set out to recreate the “Century Series” of aircraft (or variants thereof) in 1/72 scale, mainly because the planes represent a rapid change in aviation technology and many were built with a natural aluminum finish. The 1/72 scale sacrificed some detail, but at the time kits were not available for the whole series in any larger scale.
The aircraft usually included in the series:
- North American F-100 Super Sabre
- McDonnell Douglas F-101 VooDoo
- Convair F-102 Delta Dagger
- Lockheed F-104 Starfighter Bell XF-109
- Republic F-105 Thunderchief
- Convair F-106 Delta Dart
The aircraft I am adding:
- Republic XF-103 Thunderwarrior
- North American YF-107 Super Sabre
- North American XF-108 Rapier
- Bell XF-109
- McDonnell F-110A Spectre
- General Dynamics F-111 Aardvark
Models listed in bold type are foiled. I used a combination of new kits, old kits, and Anigrand resin kits to fill in the gaps.
The Tools
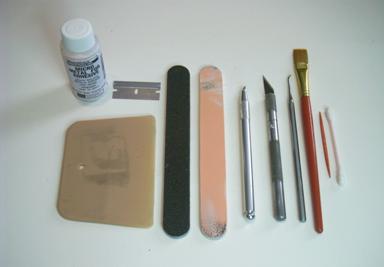
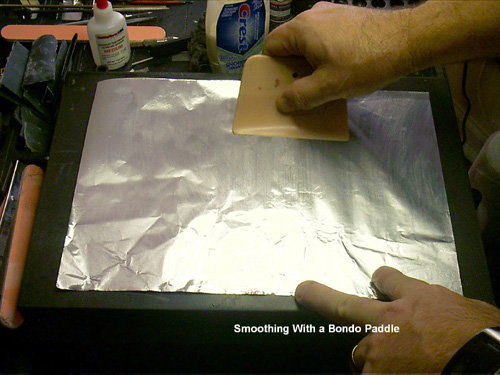
The tools required for foiling are readily available from a variety of sources. Microscale Micro Metal Foil Adhesive is available in many hobby shops or can be ordered from the internet. I was naïve enough to think I could find a generic glue I could use instead of the standard. Don’t waste your time, get the proven solution. Single-edged razor blades are a must for cutting panel lines in the foil; get plenty, they dull rapidly. The Bondo spreader is used by body shops and allows foiled panels to be flattened with ease. The black and the pink nail smoothers are available at most Dollar stores and are indispensable for smoothing joints and surfaces before applying foil. The swivel-head X-ACTO knife is great for trimming panel lines in one smooth stroke. Where would we be without our trusty X-ACTO knife? A good panel scriber works well to restore sanded panel lines. The wide brush aids with the application of the foil glue. Toothpicks are used to tuck foil into tight corners and panel lines while Q-tips are used to smooth foil irregularities.
The Technique(s)
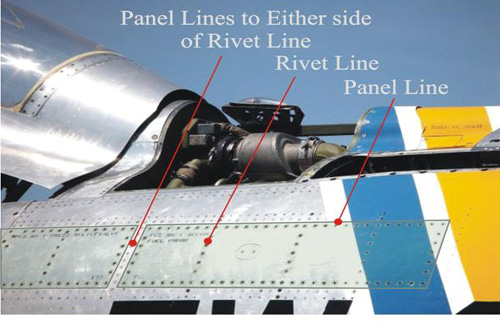
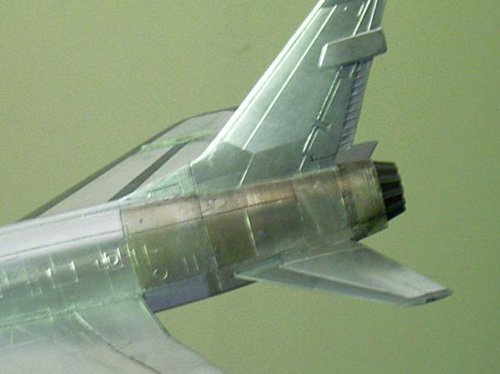
This is where my technique differs from the norm. The first temptation a beginning “Foiler” will encounter is to cover as large an area as possible with one sheet of foil. STOP! Airplanes are not built that way. For the best realism a modeler needs to take a look at the real thing and determine just which panels were added separately and which areas were done with larger sheets. Panel lines on models do not always simulate actual panels; they often simulate rivet lines on larger sheets. Without reference to the real airplane, it is difficult to determine which are which. (See the picture below). 1/48 or larger scale models usually do a better job of portraying panels and rivets. Unfortunately, the 1/72 models I chose just have lines, so I have to use my best judgment from what I find on the Internet. Planes like the Me-262 and stealth aircraft do not have seams; they are sealed with putty or epoxy.
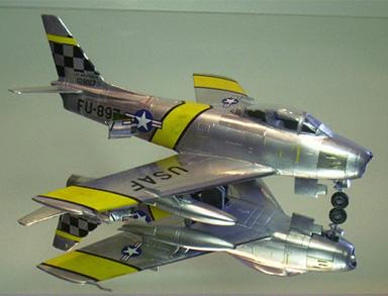
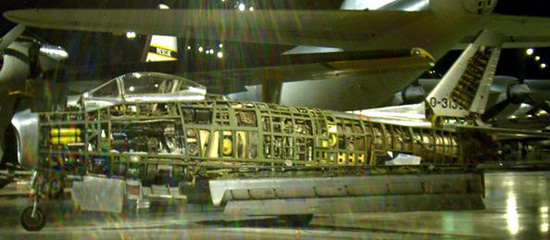
It is important to start with a map of larger and smaller panels. Put small panels where access to internal components is required. Most of these occur around the nose and cockpit areas and wherever engine or armament service is required. Larger panels will be positioned in areas of the highest stress, i.e.; the wings, the midsection of the plane, and around the tail planes. The following picture of an F-86 with its outer skin removed shows just what lies under the skin of most airplanes.
The finish of the model prior to the addition of foil is extremely critical. I think of it like this: if you paint a brick, you know what it will look like. If you foil over an less-than-smooth model, flaws will be exaggerated ten-fold. Align plastic parts as accurately as possible before gluing to minimize the loss of detail while finish sanding. This is where the nail smoothers work well; they flex ever so slightly while sanding glue seems, but do not dip into the joints like sanding with wet-or-dry or a Brillo pad can. Reinstate any detail you want. Panel lines should be kept as small as possible! The gap around full sized panels seldom exceeds 1/32”. In 1/72 scale this is a 0.0004” line! In 1/48 the line is 0.0007”, and in 1/32 scale it is 0.0010”. Technically speaking, the panel lines on anything but larger scale aircraft would not be visible. Obviously, kit manufacturers have to make a concession here; some do it well, and others do not. A good panel scribe is a must for such fine detail.
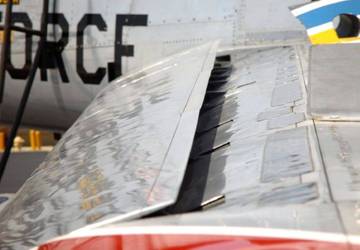
I have tried both raised and recessed panel line foiling. Raised panel lines can be foiled, but the reflection of the edges makes them look like varicose veins. The following picture shows an old AMT-released Hasegawa F-105 compared to a newer Revell F-100. The F-105 has both raised and recessed panel lines. On the F-100 they are all recessed. In strong light the differences are really obvious. Serious modelers will sand raised lines flush then re-scribe the lines to establish the recessed look. I guess it really depends on just how serious a person is when it comes to taking this kind of time.

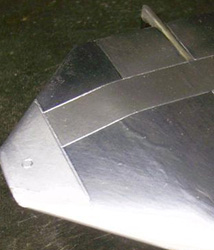
Since panel lines are so minute, I have been experimenting with a different process that shows quite a bit of promise on 1/72 scale models. I make templates for foil panels that I will be applying. I then fill all the panel lines on the model with Bondo glazing putty. I cover a large area (I know I told you not to, but this is an experiment) such as a wing with a base foil, then cut panels from my templates and overlay them on the base foil. When the edges of the foil have a clean, smooth cut the end result is really attractive with the thickness of panel lines no wider than a reflection. I can change edge appearance by using different thicknesses of foil.

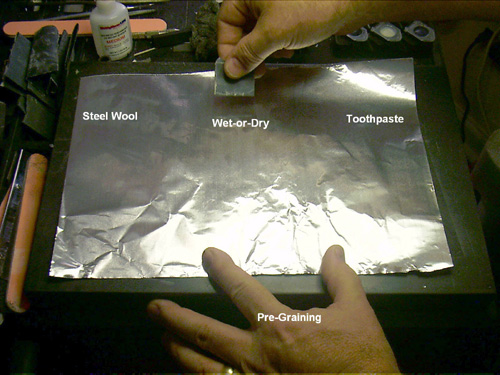
“Pre-graining” can be done with a variety of steel wool densities, fine-grit wet-or-dry, and even polishing compound or toothpaste. I cut several sheets of different foils and apply different graining on each. I randomly pick one of the pre-grained sheets to use. I use both the dull side and the shiny side of the aluminum sheet. In this case “random” is good, just don’t go crazy and make it look like a patch quilt. Wings and horizontal tail surfaces are mirror images of one another, so be sure to use pieces of foil from the same sheet and orient the grain accordingly.
Compound curves like intakes and drop tanks require thin, malleable foil. Larger panels can be done in just about any of the standard foil thicknesses. Thin foil will show any flaw, whereas thick foil can be used to cover a flaw that escaped the finish sanding process. Oh, come on now! I know you’ve all done it at one time or another!
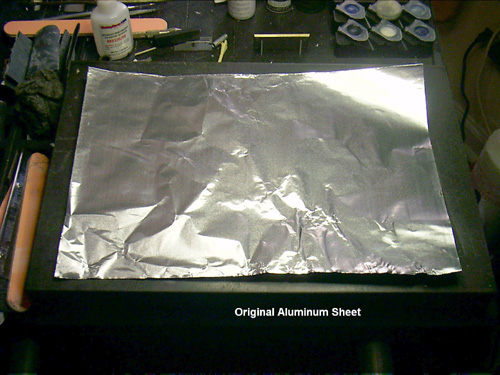
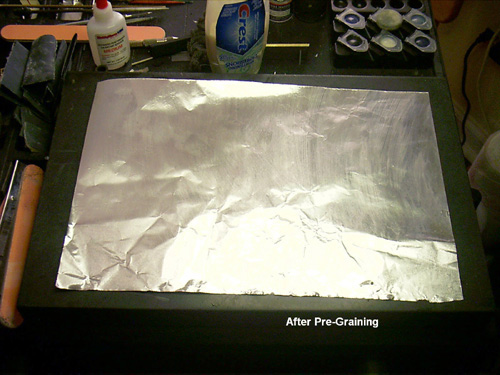
I found a nice granite cutting “board(?)” that I use to grain, layout, and cut aluminum foil. Any clean, flat surface will do. The images on the left show the simple process of pre-graining. Long, straight strokes should be used. Unless clamped down, the foil will not let you use a back-and-forth motion. It will buckle in a heartbeat. I smooth the foil after graining with a Bondo spreader and then set it aside. You might say “I don’t see any difference.” Actually, you probably won’t until a panel cut from this sheet is placed next to a panel from another.
Make sure you clean all foil that you intend to use with alcohol before you apply glue. Also, make sure the model is clean and free of glue from neighboring panels before the newest panel is applied.
Glue must be applied to the foil in a continuous film. At times, the glue will bead like water on a wax surface. Although one brush stroke is desired, you must work with the glue to form a continuous film across the foil. This is especially true for resin kits because the resin material expands and contracts dramatically even with room temperature changes! (More on this a little later.)
Graining can also be done with foil that is already on the model. The process is a little different because areas that are not to be grained must be masked off with Safe Release masking tape to avoid lifting or tearing the masked panel. Use very light, straight line strokes to avoid lifting the edges of the tape.
Special Techniques and Consideration
- Discoloration – I stumbled across discolored aluminum by shear accident. My air conditioner had a drip that needed to be diverted. A piece of foil and, WALAH! The drip problem was cured. A month later I went to check the a/c and noticed the foil had discolored; some areas were dark gray, and others were a beautiful tail-pipe gold! The galvanic reaction from the lead/copper/aluminum created some very believable overheated metal. Naturally, I used that piece of foil very sparingly until I figured out how to duplicate this gift I had been handed.
Through a lot of trial and error I can now generate a metallic rainbow of real, discolored aluminum. I use an apothecary jar with a sealed lid to make my tinting concoction. I fill the jar about half full of chlorine bleach, add some lead buckshot and 10-20 pennies. If you put foil in at this time, don’t go too far away. The foil literally dissolves in about eight hours, but in the process turns many interesting hues of gray and charcoal. Leaving it too long will render it useless, but short term dipping can produce some titanium hues.
The solution must be diluted for the straw and amber tail-pipe colors to appear. Once the pennies and lead have had a chance to do their thing on one piece of foil, I strain the mixture of the lead and pennies then dilute the liquid with water to about a 50/50 mix. I have played with the ratio, but find the more important factor is the time the foil is left in the mixture. Graining this foil will cause a slight loss of color, depending on the penetration of the chlorine mixture. Striations of color can be achieved by folding and/or wadding the foil into a ball. Just make sure the solution can reach the inside crevasses. The picture below shows some of my a/c foil applied the tail section of an F-100.
- To Clear or not to Clear – If you like the looks of your foiling project preserve it for all time with a coat of clear. Other foilers use gloss clear as a final coat. Try semi-gloss or even flat on some test panels. You might be surprised at the appearance you get. Semi-gloss and flat finishes open the door to replicating one of the other myriad aluminum finishes of aged aircraft.
- Undoing Errors – this is the cool part about foiling. If you don’t like what you’ve done, simply peel it off, scrub it with alcohol, and redo it. My poor XF-103 went through about six different foiling schemes before I settled on the final finish!
- Paint – While preparing a model for foiling, it is common to apply some paint to make sure contours are smooth and even. Be careful. Paint left in panel lines will ball up when applying glued foil and/or cutting with an X-ACTO knife or razor blade. If you leave the panel lines they must be clean and free of dirt and paint before foiling!
- Resin Models – are exasperating! Panel lines appear to be cut with a chain saw and they seldom line up across mating parts. But, that’s why we modelers are here, right? If you maintain the panel lines, make sure they line up.
Anigrand resin kits have an oddity that caught me totally by surprise. The XF-108 has a very large wing surface area. I foiled the wings using my Wal-Mart foil glue and they looked great. We went on vacation. When we came back I found bubbles in my wonderful foil job. I took the plane outside to photograph the phenomenon and much to my surprise the bubbles disappeared! I took the plane inside the air conditioned house and up they came! I began to think I had not cleaned the foil and model well enough. I systematically went back through the process, re-cleaned the foil and model, and redid the foil panels; to no avail. I then knew I had a thermal expansion problem, but wasn’t ready to start building models in the refrigerator. I found that just the low heat of a hair dryer aimed at the underside of the XF-103’s short wing would cause it to deflect ¼”. My work area is next to a window and the onset of nighttime will bring out the bubbles. In the daytime the model looks really good.
I began the search for a new glue (ignoring the best and most obvious choice) and working with different foil thicknesses. After many agonizing attempts, I went back to square one. I ordered some MicroScale Micro Foil Adhesive. Even this adhesive will allow foil to bubble on resin models if there are any voids in the adhesive film. I have never had this problem with injection molded kits. On resin kits, keep panels as small as possible and make sure the adhesive film has no voids.
The pictures below show the foiled surface with bubbles and without bubbles.
- Touch-up – Once you have completed the foiling process go over all panel lines and small touch-up areas with Aluminum Plate buffing metalizer. There is no need to be perfect here. Let it set for a few hours then buff the higher surfaces, leaving the metalizer in the crevasses. I use a felt wheel from my Dremel kit, soak it lightly with alcohol, and squeeze out the excess until it is almost dry. Use a very light touch to make sure you clean only the overage next to the seam. Let it dry for a few more hours. Use a soft cloth and wipe down the entire model.
- Foil-On-Foil – In some cases the foil-on-foil approach can be easier and will produce some more realistic panel edges on 1/72 scale aircraft. In other case it is a little more difficult. Foil-on-foil-on-foil (3 layers or more) should not overlap existing panel lines when the identity of the overlapping panel needs to stay in tact, i.e.; smaller panels such as speed brakes.
- Microscale Glue can be cleaned up with water while it is wet or paint thinner when dry. I use alcohol so if I accidentally over-wipe into a painted area the damage is minimal.
Summary
Foiling models can be a very rewarding process. It can also be a royal pain. While following the lead of others, I was able to learn a lot about the actual process. I also could not resist the temptation to think outside the box and add some individual touches. Hopefully, I have presented something new to think about for the serious modelers and have helped new “Foilers” avoid some of the pitfalls I encountered.
The models I have created with NMF are not what one would call “museum quality”. I simply haven’t learned all the tricks of the masters. I am happy with the end results and my neighbors just say WOW! In southeastern Georgia one “WOW” is worth ten “AW SHOOT’s”. I’ll let you be the judge.
I have found some other neat pictures and articles you can view by following these links (just cut and paste them into your web browser):
1/72 F-89
https://mysite.wanadoo-members.co.uk/teds-model-reviews/03-f-89-chuck-holte/page-03.html
B-29, T-6, P-51
https://www.naplak.com/modeling/articles/metal_foiling.htm
F-84, Mig-15
https://204.50.25.179/features00/f84bs_1.htm
1/32 F-86
https://hsgalleries.com/sabremk6pd_1.htm
1/72 P-51B
https://www.ipmsstockholm.org/magazine/2001/12/stuff_eng_dacoba_p51b.htm
Please visit my own web pages to see other models I have built:
https://www.frontiernet.net/~kfriend