by Steven Krick
Operation Thunderstorm
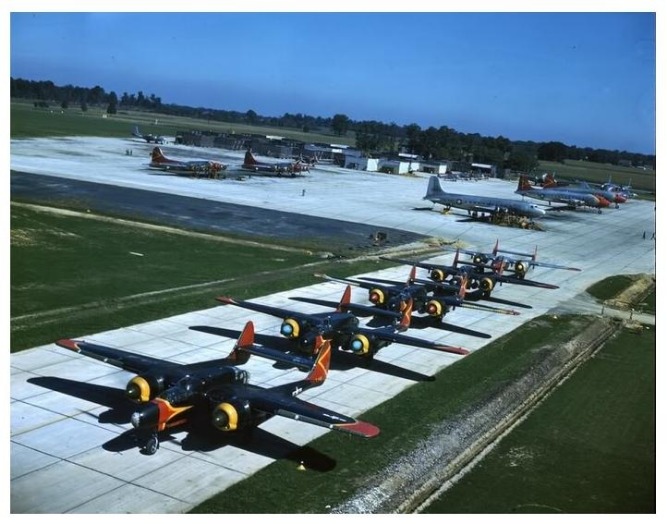
In 1945 the US Congress gave $250,000 to the US Weather Bureau to study violent weather, particularly thunderstorms. In Phase I, the main base for this study was
Phase II of the Operation was conducted at Clinton County Army Air Field in
The Operation was suspended in late 1947, with the
While searching Google Images for P-61C photos, I came across the well-known
In a Google Search for P-61C Operation Thunderstorm, I came across a reference of two decal sheets from Fox 3 decals. One was for the P-61C, and one for the F-15A. I was able to get one sheet of each, along with another sheet for the standard F-15A. On the P-61C sheet they also have the yellow “Buzz Number” that I saw in one of my reference books. It is important to keep in mind that Fox 3 decals do not provide national insignia or other decal items which normally come on the kit manufacture’s decal sheet.
A fellow modeler advised me of AeroMaster sheet #48-035, which went OOP about 20 years ago. Using the trusty Google Search, I found an outfit called 1001Modelkits, which I believe may operate out of
Aeromaster Sheet (click to enlarge)
As it turned out, I had to use the yellow flashes from this sheet as the paper masters were larger than the Fox 3 yellow flashes. So I will use the Fox 3 flashes on an upcoming F-15A Operation Thunderstorm bird. I used the red decal “Thunderstorm” that goes on the nose wheel doors, and the serial number 38354. The later goes on near the red vertical stabilizer, and as the sn is in red, the tips of the numbers that hit the red vertical stabilizer have yellow tops. Very neat indeed!
I also bought some SuperScale MS481260 decals for other markings. But the best decals I have are from the Great Wall Hobby P-61A/B kit that I located for $50.
It was a lot of fun trying to locate these items, and I was very lucky to find them.
Fun with Tape
As many modelers know, it is very difficult to air brush yellow and get a consistent color across the section painted. It usually depends on the evenness and spray pattern for the primer and the yellow paint. So I decided to cheat the fates and developed a taping process using the Frogtape Tape yellow and some Tamiya tape.
The pattern sheet of the AeroMaster decals had paper examples of the yellow flashes, so I cut them out, applied double sided tape, and attached them to card stock. Then I carefully cut out the image.
Next, the image was transferred to the kit using a .025 tip fiber pen. Then I carefully transferred the image to the yellow tape to get a male and female section. I cut out the male section, applied the female part next to the fiber tip images on the kit, carefully burnished the tape edges, and proceeded to spray the yellow paint.
Unfortunately for me, the Model Master yellow had separated into a white carrier substance and the yellow pigment. I used my Badger paint stirrer, but to no avail. The separated paint clogged up my airbrush, and I had the very devil of a time getting it cleaned out. Luckily, I had another bottle of Model Master yellow which worked perfectly.
Built Model (click any image to enlarge)
After letting the paint dry overnight, I removed the female tape and I applied the male part of the tape over the painted yellow flashes. Then I proceeded to paint the other sections, including the Insignia Red, and the gloss black.
Another issue successfully addressed concerned getting the complicated windscreen frames for the front windscreen. I put some Tamiya tape across the curved section, used the side of a #2 lead pencil lead to carefully shade the curved frame on to the tape, carefully removed the tape and placed in on a card stock, then carefully cut along the outside of the frame image. Then I cut the image in half, in order to get to the inside frame curves.
Some Lessons Learned
For this build, I decided to use my friend Larry’s suggestion to paint the parts while on the sprue runners: primer first, then finish paint. This is beneficial for two reasons:
1) It allows painting in the vertical, as opposed to the horizontal. I get better flow and paint coverage in the vertical.
2) It prevents trying to finish paint the completed model with its many hidden areas. This often results in uneven paint coverage.
When the parts are carefully cut from the sprue runners and glue them together, there are some sections that have to be body puttied and sanded, but the clean up is much easier to do. This is followed up by another spray of finish paint for these spots if necessary.
I also had a challenge in locating the unique ILS antenna shown behind the gunner’s station. I contacted the guy who wrote the F-15A article on the web, and he was kind enough to advise me of the correct name of the antenna. Then I put an ad in Network54, Buy, Sell, and Trade, and some fellow responded that the antenna was used in the Monogram C-47A kit! So next I went to E-Bay and located a C-47 kit being auctioned. I asked a seller to identify the name of the antenna and kit number. And she did it!
Then, since I knew the name of the antenna and the fact that it was found on a C-47, I went back to E-Bay to see if any resin was available. It was! So I got the resin C-47 antennas (all of them), for $16. Since the C-47 kits are going for $25-$35 plus shipping, this was a significant savings.
I had to fabricate another distinctive antenna that is placed on the top of the gunner’s station canopy. The resin antenna looked very “heavy,” so it was fabricated from plastic sheet and rod also.
Completed Kit (click any photo to enlarge)
By the way, I will probably get several questions about the gray stripes on the LE wing deicers. I could not find out what these things are, but speculation says they may have something to do with dissipation of lightning. If you look carefully on the attached photo, you can see them on the #1 bird and the #3 bird.
The Revell/Monogram 1/48 P-61 is a substantial kit. With a little work, makes up to a very nice model. Although it leaves much to be desired as to fit and form (my P-61C ended up with a 2mm gap when I tried to ca glue the horizontal stabilizer and the wing/center fuselage joint), all worked out OK. I have learned to carefully sand the mating parts with 220 grit aluminum oxide paper to remove all flash and mold release points.
Next Build
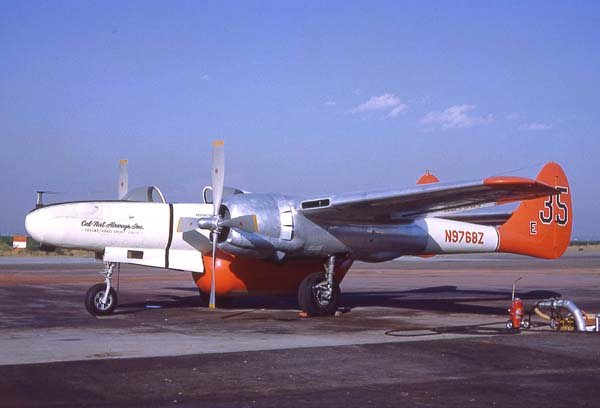
Next build is planned to be an F-15A Water Bomber, using the GWH kit, and the LSM conversion. And yes, that is an F-15A bringing up the rear, which is my project after the Water Bomber.


