
by Alan Bussie Google+ profile
- Introduction
- How are decals made?
- How can old decals fail?
- Common problems and solutions
- Making new decals
Introduction
With fewer molds being run by fewer manufactures, many modelers are turning to the older kits to find desirable subject matter. The plastic usually ages well, but the decals can become troublesome. Most decals were not designed to last and time and environment can take their toll. Luckily, many highly experienced builders and collectors have been willing to share their hard-earned knowledge on saving old decals. I would specifically like to thank Jim Allen, Ken Friend and Larry Johnson for their contributions.
How are decals made?
Decal paper then and now is composed of a thin, strong paper with a thin clear film and water-release adhesive. The vast majority of decals from time immemorial were silk-screened. Silk-screening utilizes different screens for each color starting with the lightest and finishing with the black. The major reason for misalignment was always the backing paper which would begin to expand with each color. The rapid improvement of screening materials, backing papers and inks bring us the great decals we enjoy today which are still silk-screened.

Commercial Silk-Screen Printing Press
The wax-based toner printer ALPS is used by some specialty decal providers but the technology has been discontinued by the manufacturer. When the designs were dry, the printed design was masked and coated with a varnish or a water-proof clear. This protected the inks from ‘running’ in water, strengthened the thin film around the design area and provided a close-to-design shape that could be easily manipulated during application.

Alps Wax-Film Printer
How can old decals fail?
Plastic model kits, like most toys, were intended to be disposable and had a short life-span by design. The quality of decals varies greatly, either by accident or intentionally. For example, MPC decals from the 1970s are notorious for lifting completely from the backing paper, even in dry storage. On the other hand, my son and I just built a 1970s US Airfix Banshee with ScaleMaster decals and they functioned perfectly. The quality of the backing paper, adhesive, inks and varnish would contribute to durability. For example, decals can become brittle because the varnish has become inflexible, and the varnish may yellow with age. Other than initial quality, the storage environment can hasten the demise. Moisture damage is common or the transfers may develop visible cracks or micro cracks. Scratches, fading and factory printing errors are also common.
Common problems and solutions
- Yellowing
Yellowing is probably the most common issue with old decals. A yellow tint can form on the paper backing, in the varnish or both.
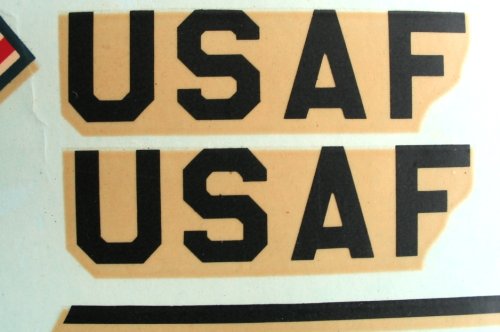
Discolored Varnish Film
There does not seem to be a pattern to why yellowing happens. Some swear that if you keep the decals inside the instructions, they will not yellow. Others swear that keeping decals away from paper or cardboard products protects them. Some store them out of the kit in plastic sleeves and avoid direct light. The latter suggestion may be the most effective, but you should simply do what works best in your environment. But decals of lesser quality may yellow regardless. To fix this, simply support the decal inside a sun-facing window with a piece of cardboard backing and tape. The yellow will disappear or be greatly reduced after a few days of exposure to the sun. Regardless of your success, please take the additional steps below to avoid cracking. If the yellow is not removed, there is another solution that will be discussed below.
- Cracking or Micro Cracking
Cracking is another common defect that can occur in the clear ‘carrier’ film or the protective clear. Some cracks are visible to the naked eye; others may look perfect but may be micro cracked. This can usually be observed at 10x to 14x magnification.
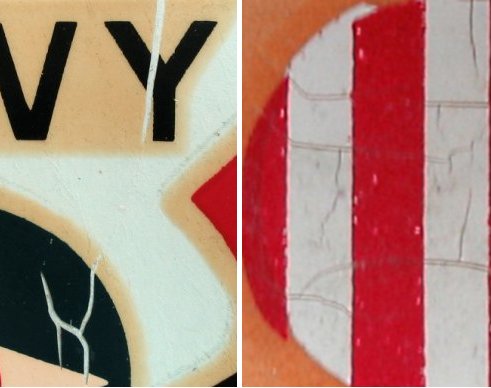
Cracking (left) and Magnified Micro Cracking (right)
If cracked decals are placed in water, the designs will shatter into dozens of pieces. If you suspect that your decals have cracking or simply don’t want to find out when it’s too late, consider applying a new protective clear coat. Many modelers have had great success with these products and similar:
-Microscale Industries “Liquid Decal Film” (provides the thickest, durable film)
-Krylon brand Acrylic “Crystal Clear”. It comes in flat, semi-gloss and gloss.
-“Future” Floor Polish (when a very thin coat is needed)
All three methods work well, but you will need to experiment to find the coating thickness that works best. If it is too thick the decals will not handle or adhere well; too thin and they will fall apart in the water. Liquid Decal Film usually needs only one coat; Future may need 2-3 coats and Krylon needs 4-5 medium wet coats. I highly recommend that you experiment with some non-critical samples. In this case, practice really does make perfect.

Future, Microscale Film and Crystal Clear
- Lifting and Other Defects
Lifting can happen on poorer quality or environmentally-abused decals. The clear film may lift from the backing paper, the adhesive may fail or other combinations of circumstances. I personally do not try to fix lifting decals and don’t recommend it. If you have a computer, photo software and a printer, it may be best to make new decals. This also works best if you have faded colors, factory errors, incorrect colors, scratches or other damage.
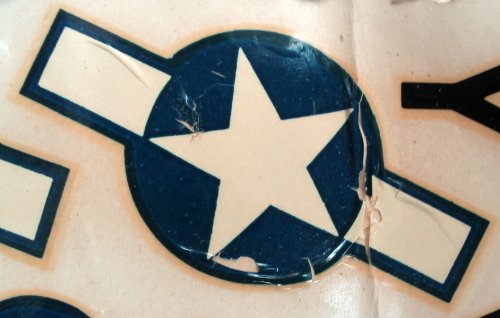
Lifting and Peeling Decals
Making New Decals
There is an excellent article by Ken Friend on this website that details making your own new decals. Ken scans each decal before he uses them, simply as a back up or for printing them for a future project. This is very advisable. I will not repeat his entire work here but will summarize and add when appropriate.
- Scanner Settings
It is critical to scan the original at the proper resolution dpi (dots per inch). Use a setting of 600 dpi minimum. You may use higher settings, but it may not produce a visible difference to the eye. Higher resolutions will result in larger file sizes and may slow down your computer and printer. Using too low of a resolution will lead to “stair stepping”. This will result in round corners not appearing smooth.
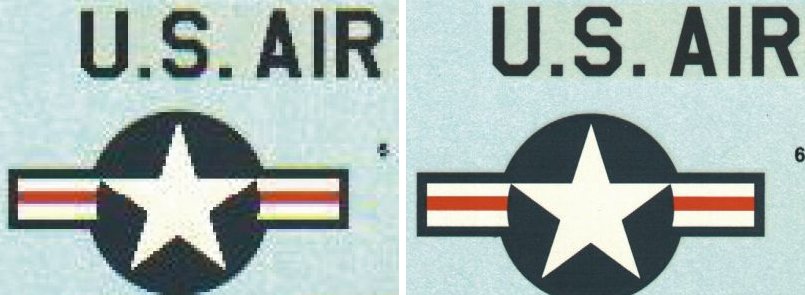
‘Stairsteping’ from 75 dpi (left) and smooth curves from 600 dip (right)
To put it simply, remember that a line is simply made up of a series of dots. If the dots have the right density (dpi), your eye is fooled into thinking that you have a solid line. If they have too low of a dpi, the eye is not fooled and sees individual dots or blocks of dots.
- Computer Manipulation
To restore decals completely, you will need laser or inkjet decal paper (such as Bel Decal Inc.), a clear coating such as Krylon Krystal Clear or Microscale Decal Film, a scanner to scan your decals to a file such as a JPEG or bitmap, software that can manipulate the file, and a color laser jet or ink jet printer to print the final design.
After scanning the decals to the digital format of your choice, the image can be manipulated. This may include re-attaching lifted sections, filling in scratches, rebuilding missing designs, correcting factory errors such as scale (size), faded or incorrect colors, cleaning up factory mistakes or anything else your program can do. The choice of programs for this work is almost limitless and everyone has their favorite. I use a very old version of Adobe Photoshop; most people use new versions of Photoshop, ULead Photoimpact and even the free shareware program Paint.net. Each has good and bad points. If possible, ‘try before you buy’ -download trial versions of any software you are interested in and put them to the test.
Example Computer Restoration Steps
- Determine key designs to restore – do not restore any duplicate designs or anything that could be reproduced by copying or transposing.
- Open a clean blank “sheet” at the exact dpi that your scanned decal image is
- Use select and cut commands to move designs to the clean ‘sheet’ – this eliminates background yellow or color ‘noise’ beyond the design
- Restore the moved designs
- Repair major damage graphics or missing sections. Work first at low magnification then move to progressively higher magnification.
- Resolve any scale (size) issues
- Add any new designs, either from scratch or scanned in artwork
- At a moderate magnification, clean up all edge lines by expanding them slightly beyond bounds then recreating the edge with white line
- Change colors as needed for realism or taste. If you wish to match a certain color, simply scan in a photo with the desired color. Most programs will then numerically define the color for you, making a perfect match
- Use ‘copy’, ‘mirror’, ‘translate’, ‘transpose’ or other functions to recreate symmetrical decals
- Save your work – not just now, but often during restoration
- Rearrange the designs on the sheet so that you have at least one inch (2.5 cm) on all sides to allow for margin on your printer

Revell United 747 decals with water damage, missing design and cracking (above)
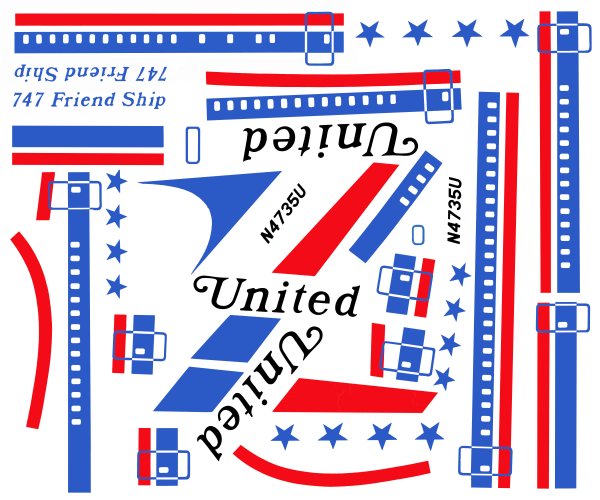
Same decals after computer restoration and repair by theauthor
- Printing Your Decals
It is critical to decide if you will be printing with a laser printer or an inkjet. Inkjets provide better resolution and slightly better color control, but the final design will have to be clear coated before use. Laserjets do not need to be clearcoated and can be applied to the model directly after printing. High quality laser printer will print in 600 dpi and give excellent results. Each process, however, requires a specific decal paper. Laser decal paper has a higher temperature film. Do not use inkjet decal paper in a laser printer.
Even if you do not have a printer, you can use one at a copy center or business center. Be sure to ask which printers are of the highest quality. Often these are not the self service printers, so they will cost slightly more – but it is worth it. It is unlikely that the copy center will have decal paper, so be sure to bring your own.
I highly recommend that you test print a section of your decal on photo glossy paper before using your decal paper. Set your printer settings to “photo glossy” paper type and the resolution to the same as your image file. Most printers will not specify a resolution, so simply set it to “Best” print quality. “Best” is usually 600 dpi or much higher. Print a section of your decal that represents all major colors on photo glossy paper. If you approve of the colors, you are ready to print on decal paper. If not, change the colors and retest till you are happy with the colors. Often colors on your screen look different when printed, even on glossy photo paper. This is due to your operating system (especially Windows) choosing the colors for you.
Now you are ready to print on the decal paper. Verify that your printer is set to “Photo Glossy” paper type and the highest print quality.
- Clear Coating
If you printed with a laser jet, you do not need to clear the decals. They are ready for use. If you printed with an inkjet, clearing the designs is necessary. The most common mistake is not putting on enough clear if you are spraying it on. If spraying Kyrlon Acrylic Crystal Clear, spray one medium coat in one direction. Let that coat flash off, and repeat 4 more times changing the spray direction 90 degrees each time. Why applying a brush coating like Microscale Decal Film, one medium coat is enough if you have complete coverage.
- Using the decals
Unless you used a mask to paint your clear, you have actually created one very large decal that is the size of the entire sheet. You will need to trim all designs closely to avoid having excess clear carrier. You can use the usual decal setting solutions and solvents to help the decal lay flat. I always recommend a coat of gloss clear or Future on the model before applying decals. Finish off with matt clear or semi gloss over the decals according to your needs.
- White Decals
Unless you have the advantage of a wax film printer, you will not be able to print ‘white’ since it is the absence of color. Inkjet and laser jet printers simply interpret that as the absence of color and do not print. There are two ways around this:
1. Decal paper comes in clear or white background. For decals that have white in them, print them on white paper. You will need to trim the design exactly before using them as the entire background color is 100% white. You can make this easier by outlining each white design with a thin, black line. When you cut out the designs, cut just inside the black line.
2. Print your regular file on clear decal paper. Create another file that has only a very fine outline of any design that has white in it. Print that on the white decal paper. Cut out the white designs according to your outlines and apply them to the model first. Then apply the color designs from the clear paper over the white ones.
- Professional Silkscreen Printing
If you do the design work, it is affordable to have a professional silkscreen your decals for you. There are several advantages – he or she can make designs in white, and you can save time. One source, just for example, is Jeffrey Waclawski . His website is www.jt-graphics.com and email is info@jt-graphics.com. Please keep in mind that design of these decals is different. You will need to produce each color in its own digital design ‘layer’, as the silkscreen printer will print them one color at a time.
Summary
Regardless of your decals condition, all is not lost. There are many repair techniques and if all else fails, make your own.