
Many customers have written emails asking how to build vacuform kits. My skills in this area are lacking – which is a nice way of saying that I have ruined most of the vac kits that I have started. But I noticed several customers – like David Miller – who purchased vacuforms repeatedly. I asked, and he sent me photos of his completed models. They are incredible! He was kind enough to write this article. I hope you find it as educational and enjoyable as I do. Alan Bussie
By Dave Miller
“Significant modeling skill is required to build vacuform kit. Not recommended for beginners.”
This statement is contained in the description of many vacuform models offered through Old Model Kits (www.Oldmodelkits.com). It is intended to inform potential buyers that a vacuform kit is substantially different from the injection-molded kits offered by major brands such as Airfix, Revell, Tamiya, Hasegawa and Monogram. Generally, major brand injection molded kits have detailed instructions, painting guides, good to excellent part fit, and require minimal preparation prior to painting. Vacuform kits may also share some of these characteristics, but generally do pose their own unique challenges. Having said this, however, building a vacuform kit gives one an opportunity to develop some new modeling skills. If you’ve built several injection-molded kits, then you may already have experience with filling seams, re-scribing panel lines and adding aftermarket or scratch-built details to models. These same skills are needed when building a vacuform model. Most importantly, with some care, a beautiful and unique model can be built from a vacuform kit.

1/72 B-32 Dominator
(Click photo to enlarge)
Probably the chief reason that builders contemplate the purchase of a vacuform model is that the subject is not available in an injection-molded kit. Many vacuform kits that are sold through Old Model Kits can be considered “antiques” and the companies, such as Contrail and Rare Plane, that produced them are no longer in existence. These kits were never produced in large numbers. Because of their subject matter, good quality, and scarcity, some of these kits command substantial prices. However, Khee Kha and VLM are small enterprises that are currently producing quality vacuform kits at modest prices.
About Vacuform Kits
The following information is for the benefit of modelers who have never attempted to build a vacuform kit. Typically, a vacuform airplane kit consists of one or two plastic sheets with the model’s right and left fuselage, upper and lower wings and horizontal stabilizer panels molded into them.


RarePlane A2D-1 Skyshark Vacuform Kit
(Click photos to enlarge)
The molding has been accomplished by using a vacuum table to draw a heated sheet of plastic into or over a mold. While some vacuform kits lack fine detail, others are well molded and contain panel lines, rivets, textures and complete interiors similar to injection-molded models. Vacuforming has also been used to produce model boat and ship hulls.
The assembly instructions for many vacuform kits are quite basic and may consist of little more than an exploded diagram of the model. Other vacuform kits (Such as Khee Kha kits) come with very detailed instructions, diagrams, and building tips. Either way, it is advisable to have a complete understanding of how the kit fits together before you start.
The cutting and sanding of the parts are perhaps the biggest differences between the assembly of a vacuform kit and an injection molded one.
Cutting
This is the first step in the construction of any vacuform kit. The model’s components have to be cut from the plastic sheet. It is not difficult and the plastic is softer than that used with injection molded models. You can cut components away with an X-acto knife, a panel scriber, or a pair of good quality utility scissors. If you are new to vacuform models, is best to cut a ¼ to ½ inch ‘safety margin’ around the parts – do not try to cut the parts out perfectly unless you have experience. Don’t worry about the extra material – it will be sanded off in the next step. You may want to practice on some scrap material to get the “feel” of the plastic sheet before cutting out the components.


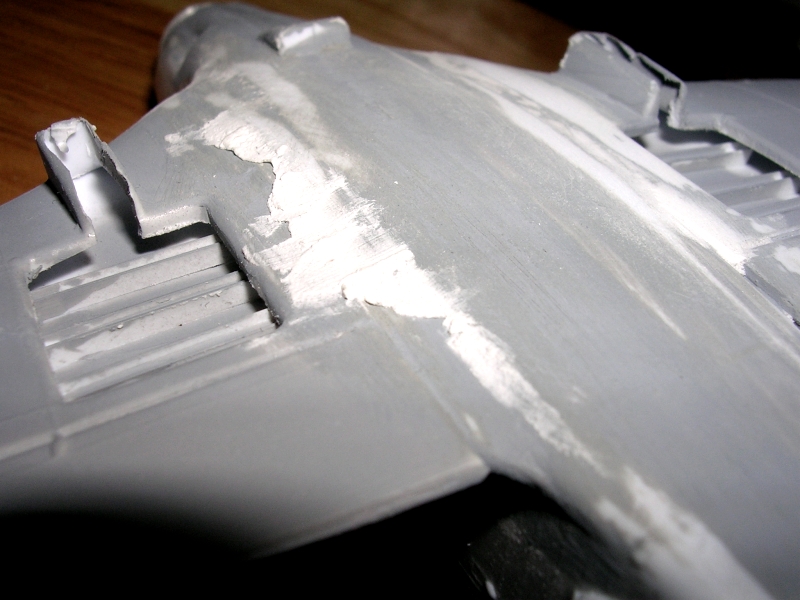
Skyshark parts cut out (left) and sanded (right)
(click photos to enlarge)
Sanding
This second step is slightly more time consuming but critical to success. Once the components have been cut from the sheet, the mating edges of the pieces need to be sanded down flat and to the thickness of the plastic sheet, typically, about 1/32 inch. This brings the fuselage halves down to a scale width and gives the flight surfaces a thin trailing edge.
In order to sand the kit pieces uniformly and evenly, the mating edges are sanded on a full sheet of 220 grit sandpaper that has been glued to a FLAT surface such as a pane of thick glass or a sheet of plywood. To glue the sandpaper down, you may wish to use spray adhesive that applies a thin, consistent coat to the sandpaper. Stay away from glue that will cause bumps or irregular surfaces. Draw the component pieces across the sandpaper with an even pressure until the mating surfaces have been sanded down. If you left on excess material during cut out, that material will be removed during this sanding process.
Test fitting while sanding is high recommended. This will not only reveal when the parts are ready to go together, but will keep your sanding even. It is easy to apply too much pressure to one section of the part being sanded; doing so will cause material to be removed irregularly and results in a poor fit. Experimenting with an inexpensive kit is recommended. A little additional time spent sanding carefully will make assembly go much faster and result in a finer model.
Assembly
When the components have been sanded to a proper thickness, the model can then be assembled much like an injection molded kit. The parts that you created are usually stiff enough for assembly and the subsequent filling and sanding. However, some modelers like to add internal wing spars, fuselage bulkheads or other structural support. The larger the model, the more need for such structure. Balsa & hard woods or sheet plastic are excellent materials. Since there are no locater pins like injection molded kits, some builders glue plastic or wooden alignment tabs on the inside of fuselages. This can come in handy if the fuselage has a slight warp, or you want to add support to an area that will get puttied and sanded.
Vacuform kits often include white metal or resin cast engines, propellers, wheels and landing gear struts. These items will usually require some clean-up or other preparation before assembly, similar to injection molded kits. Creating and adding extra detail to cockpits and wheel wells, or cutting and extending flaps are within most modelers’ range of scratch building skills. If you wish to purchase aftermarket details, companies such as Aeroclub provide a wide range of metal or resin parts.

Resin parts from 1/72 RCM Convair R3Y-2 Tradewind
(click photo to enlarge)

Cast metal parts from Contrail H.P. 42.45 model. Raw castings are on the left – prepared parts on the right (click on photo to enlarge)
At this point in the build, there is very little difference between completing a vacuform and an injection kit. If you have built several injection-molded kits, then the rest of the assembly includes experience that you probably already have such as filling seams, re-scribing panel lines, and adding aftermarket or scratch-built details to models.
Skyshark in progress
(click photo to enlarge)
Decals
Some vacuform kits do not contain decals but you can use spares and aftermarket decals to complete a model. One can also buy plain decal paper and use a laser or inkjet printer to make your own decals (please see the articles on this website or other sites on how to make your own decals or save older decals).
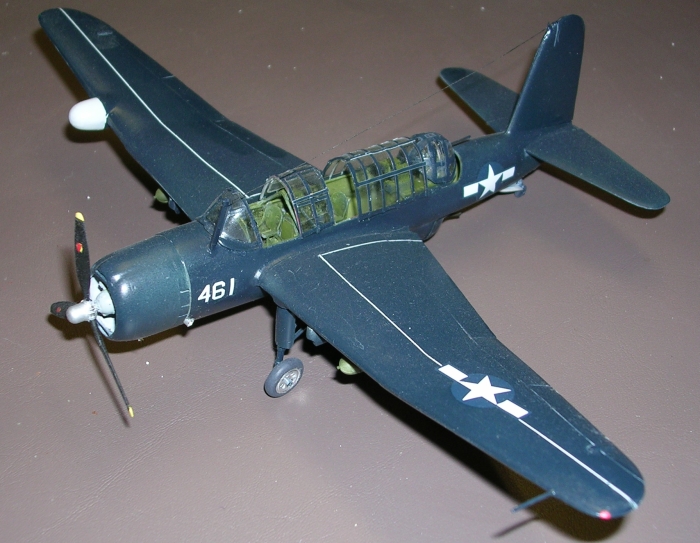
Completed 1/72 RarePlane Skyshark
(click photo to enlarge)
As noted above, probably the chief reason that builders contemplate the purchase of a vacuform model is that the desired subject is not available in an injection-molded kit. If you have some scratch building skills and enjoy the process of filling and painting a model, you will likely find that building a vacuform kit is a rewarding experience. So, if you find a vacuform kit of that rare and unique airplane that you have always wanted to model, GO FOR IT!
Other Completed Vacuform Kits
1/72 scale Sea Wolf
(click photo to enlarge)

1/48 scale Brewster Buccaneer
(click photo to enlarge)

Esoteric 1/72 scale Martin AM-1 Mauler
(click photo to enlarge)